Installation#
This document describes how to set up a self-contained deployment of Inrupt Enterprise Solid Server (ESS). The installation uses Minikube (version 1.2.1 or earlier) to run a single-node Kubernetes cluster inside a Virtual Machine (VM).
Note
Although the tutorial uses Minikube for its development/testing environment, you may choose to run ESS on other Kubernetes environment.
Pod Spaces (Alpha)
Inrupt provides hosted versions of the Enterprise Solid Server, eliminating the installation overhead. For more information, see Inrupt Pod Spaces.
Overview#
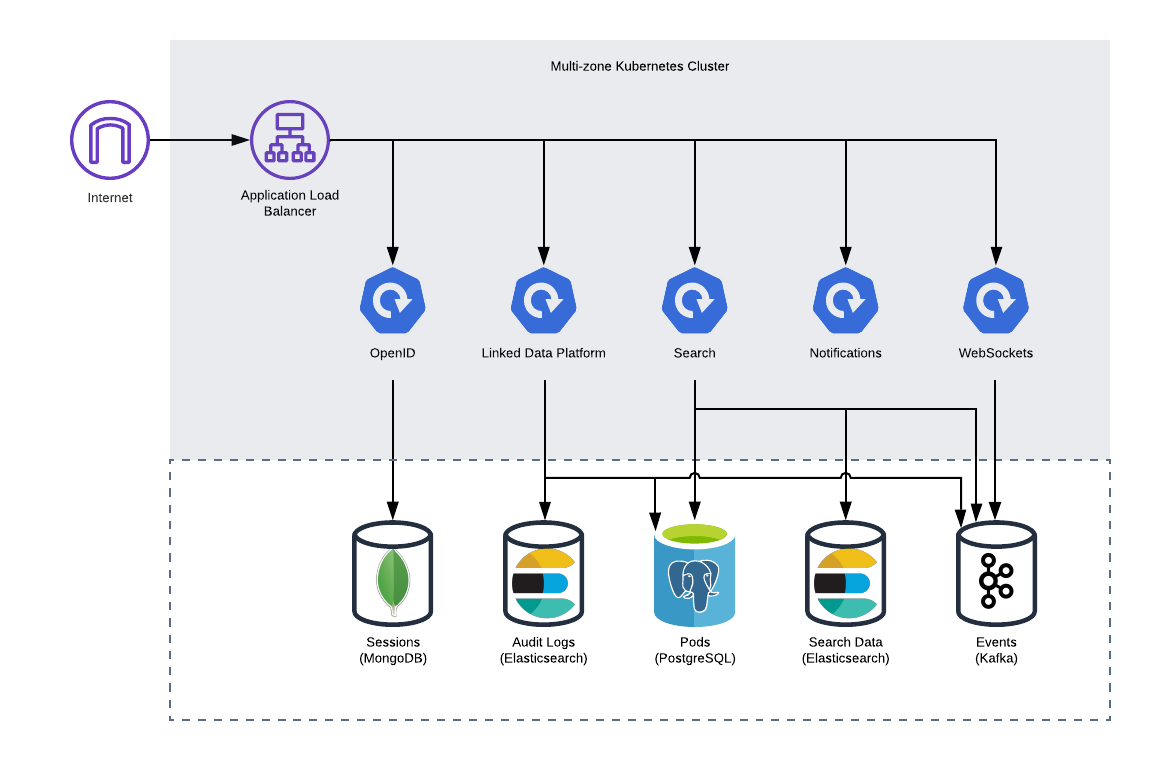
The following diagram provides an overview of the ESS services and the backend services they use. This self-contained deployment installs the backend services in your cluster.
Operating System#
This guide provides installation instructions for the following operating systems:
Ubuntu
macOS
Prerequisites#
Entitlement Token#
To login to Inrupt’s private Docker registry and download the reference ESS Kubernetes configuration files and ESS Docker images, your enterprise needs to obtain an entitlement token from Inrupt.
For inquiries (including pricing inquiries) about obtaining the token, you can either:
Contact your Inrupt representative; or
Contact Inrupt’s Business Development team.
Package Manager#
Update the list of available packages and their versions, and upgrade the installed packages:
sudo apt update && sudo apt upgrade
Update the Homebrew and local formulae and upgrade outdated packages (you can upgrade specific formulae as an alternative):
brew update && brew upgrade
Note
If you encounter issues using the latest versions of your packages, it may be that, after troubleshooting the issues, you may need to use an older version of a package or packages.
Archive Extraction Tool#
An archive extraction (i.e., unzip) tool is required to extract
downloaded .zip files.
To install unzip, run:
sudo apt install unzip
By default, the unzip command is available in the Terminal.
Minikube and Hypervisor#
This tutorial uses Minikube for the Kubernetes environment. In addition to Minikube, you will need a Hypervisor to run a Minikube virtual machine (VM).
Known Issue
ESS 1.1 installation on Minikube requires version 1.21 or earlier.
Install:
Minikube (if not installed). Follow the OS-specific instructions at https://minikube.sigs.k8s.io/docs/start/.
A Hypervisor as listed on the Minikube Installation page (if not installed). Refer to the specific Hypervisor documentation for installation. This reference tutorial uses VirtualBox.
kubectl#
To manage the Kubernetes cluster, install kubectl (if not
installed). Use the directions at
https://kubernetes.io/docs/tasks/tools/install-kubectl/.
Kustomize#
New in version 1.0.9.
The installation scripts use Kustomize to configure the deployment. If Kustomize is not installed, refer to its official site for download instructions.
Once downloaded, add kustomize to your PATH.
JSON Web Key Values#
ESS installation prompts for two JSON Web Key (JWK) values (base64-encoded) during initialization.
For a non-production environment, you can use Inrupt’s JWK generator Docker image.
To run the JWK generator Docker image, you need to have Docker installed and running.
Open a terminal shell and login to Inrupt’s private Docker registry. When prompted for your password, enter your entitlement token:
docker login --username <userid> docker.software.inrupt.com
On a terminal shell, run the following docker command to generate an Elliptic Curve (EC) JWK for your OpenID service:
docker run docker.software.inrupt.com/inrupt-openid-jwk -t EC | base64 -w0
Run the command again for the second JWK for the WebSocket service:
docker run docker.software.inrupt.com/inrupt-openid-jwk -t EC | base64 -w0
To run the JWK generator Docker image, you need to have Docker installed and running.
Open a terminal shell and login to Inrupt’s private Docker registry. When prompted for your password, enter your entitlement token:
docker login --username <userid> docker.software.inrupt.com
On a terminal shell, run the following docker command to generate an Elliptic Curve (EC) JWK for your OpenID service:
docker run docker.software.inrupt.com/inrupt-openid-jwk -t EC | base64
Run the command again for the second JWK for the WebSocket service:
docker run docker.software.inrupt.com/inrupt-openid-jwk -t EC | base64
The installer script will prompt for the two JWK values for use during the initialization process.
OIDC-Compliant Identity Provider#
ESS integrates with your OpenID Connect (OIDC) compliant Identity Provider (IdP).
Refer to your IdP’s official site to set up an OIDC application. When
configuring the application, set the redirect URI to
https://broker.<ESS Domain>/callback.
Tip
Contact Inrupt Support Center for guidance setting up an OIDC application with your IdP.
Installation#
Step 1: Start Kubernetes Cluster#
Non-Minikube Environments
Although the tutorial uses Minikube for local development/testing, you may choose to use another Kubernetes environment for your ESS deployment.
If you are using a different Kubernetes environment, you must adjust the steps to enable various capabilities (Ingress controller and certificate management controller) for your environment. To configure your Kubernetes environment, refer to your Kubernetes-specific documentation to enable these features.
The Kubernetes cluster runs within a Minikube virtual machine (VM).
Known Issues
If using Minikube, ESS 1.1 installation on Minikube requires version 1.21 or earlier. Ensure your Minikube version is 1.21 or earlier.
Open a Terminal window.
Start Minikube with the minimum recommended resources.
minikube start --vm-driver=virtualbox --cpus 8 --memory 16384 --disk-size=50GB
Verify the status of the Kubernetes cluster:
minikube statusThe operation should return output that resembles the following:
minikube
type: Control Plane
host: Running
kubelet: Running
apiserver: Running
kubeconfig: Configured
Verify access to Kubernetes:
kubectl get all
The operation should return output that resembles the following:
NAME                 TYPE        CLUSTER-IP   EXTERNAL-IP   PORT(S)   AGE
service/kubernetes   ClusterIP   10.96.0.1    <none>        443/TCP   48m
For service routing, you need an Ingress controller to manage external access to the services in the cluster. Enable the NGINX Ingress controller:
minikube addons enable ingress
Note
The operation can take up to a minute.
Verify that the NGINX Ingress controller is running:
kubectl get pods -n ingress-nginx
The operation should return output that resembles the following:
NAME                                         READY   STATUS      RESTARTS   AGE
ingress-nginx-admission-create-w7mpj         0/1     Completed   1          24h
ingress-nginx-admission-patch-prmjs          0/1     Completed   1          24h
ingress-nginx-controller-59b45fb494-sf4t4    1/1     Running     1          24h
Install cert-manager to your Kubernetes cluster:
kubectl apply -f https://github.com/jetstack/cert-manager/releases/latest/download/cert-manager.yaml
Verify that cert-manager is running:
kubectl get pods -n cert-manager
The operation should return output that resembles the following:
NAME                                         READY   STATUS      RESTARTS   AGE
cert-manager-7c6f78c46d-96f48                1/1     Running     1          24h
cert-manager-cainjector-668d9c86df-k2q82     1/1     Running     1          24h
cert-manager-webhook-764b556954-qz6cz        1/1     Running     1          24h
Step 2: Download the ESS Installer and Configuration Scripts#
Create the ESS directory (
ess) and change to the directory. For example, to create the ESS directory under your home directory:mkdir ~/ess && cd ~/ess
Download the
.zipfile containing the latest ESS installation and configuration scripts. Replace<ENTITLEMENT_TOKEN>with the entitlement token provided by Inrupt:curl -O https://download.software.inrupt.com/<ENTITLEMENT_TOKEN>/release/raw/names/ESS-Kubernetes-Deployment/versions/latest/configuration-reference-kubernetes.zip
Tip
To download a specific version instead of the latest version, change
latestto the specific version in thecurlcommand.Unzip the file:
unzip configuration-reference-kubernetes.zip
Step 3: Initialize ESS Environment Variables#
Go to the
deploymentdirectory:cd deployment
Initialize your Minikube environment, substituting your environment (such as
dev,testing, etc.) for<env>:./scripts/installer.sh -e <env> -c init
The script prompts for various values needed to build your deployment configuration files and stores these values in an ESS config file
<env>.config.Initializing ESS version [1.1.0] for Minikube environment. Enter your token for Inrupts private docker registry: Enter an email to be used as the owner of HTTPS certificates (used for expiry notifications): Enter a name for the environment [dev]: Enter the domain where you are hosting ESS [ess.mycompany.com]: Enter the OpenID broker version [latest]: Enter your OIDC authentication server URL (e.g. Cognito): Enter your OIDC client ID: Enter your OIDC credentials: Enter a password for the mongo used to store sessions [-auto-generated-]: Enter your OpenId JSON Web Key (JWK) for signing (it should be base-64 encoded): Enter a different JSON Web Key (JWK) for signing tokens for the WebSocket service (it should be base-64 encoded): Enter a password for the mTLS Keystore [-auto-generated-]:
Enter the appropriate values needed to build your deployment configuration files. For example, for the
JSON Web Keyvalues, enter the values generated during the prerequisite step.The
initoperation finishes with a message similar to the following, where<env>value is substituted with your<env>value (e.g.,dev,testing):Created ESS config [<env>.config].
For sake of simplicity, the remaining sections assume the
<env>value ofdev; i.e.Created ESS config [dev.config].
Step 4: Install ESS Services#
Note
For sake of simplicity, this section assumes the <env>
value of dev (and the existence of the dev.config file). If
your environment value differs, pass that value to the script’s
environment -e option.
Run the
installer.shfile to build your ESS Minikube configuration files for your environment. The example assumesdevenvironment../scripts/installer.sh -e dev -c build
The
buildoperation backups the previous deployment, if any.Run the
installer.shfile to deploy ESS:./scripts/installer.sh -e dev -c install
The
installer.shprints the following line upon success:ESS deployment installed successfully!
Tip
If the deploy operation does not complete successfully, you can safely retry the operation as it is idempotent. For example, if you encounter an error like
error: unable to recognize "STDIN":
...
, you can rerun the install command.If the retry also does not succeed, see also Troubleshoot Installation.
Warning: Self-signed Certificates
The script creates self-signed certificates. These self-signed certificates are for development purposes only. In production, ESS should be run with certificates from an official Certificate Authority (CA). For an example of how you can customize your deployment to use your production certificates, see Use Official Certificate Authority.
You can view the ESS components and services that are running:
kubectl -n ess get all
Step 5: Add ESS Domains#
ESS exposes the various services for external access. Edit the
/etc/hosts file on your local machine to map the Minikube
Internet Protocol (IP) address with your ESS service domains.
Find the IP address of the Minikube VM:
minikube ipThe operation should return your Minikube IP Address.
Edit the
/etc/hostsfile to add the service domains. Replace<Minikube IP>and<DOMAIN>with your values:<Minikube IP> access.<DOMAIN> identity.<DOMAIN> fragments.<DOMAIN> registration.<DOMAIN> ldp.<DOMAIN> notification.<DOMAIN> signup.<DOMAIN> websocket.<DOMAIN> <DOMAIN> id.<DOMAIN>To edit the
/etc/hostsfile, you need administrator privileges.
Important
If you delete the Minikube VM and rebuild a new VM, your Minikube IP could change and you will need to update the hosts file with the new IP value.
Step 6: Accept Self-Signed Certificates#
Warning
The self-signed certificates are for development purposes only. In production, ESS should be run with certificates from an official Certificate Authority (CA). For an example of how you can customize your deployment to use your production certificates, see Use Official Certificate Authority
If you are using self-signed certificates in your development environment and you encounter self-signed certificate warnings when accessing these services, accept them.
Monitoring
See also Monitoring.
Verify Installation#
Open a web browser to
https://<DOMAIN>/verify.html, substituting your domain for<DOMAIN>.On the displayed Enterprise Solid Server Deployment Tests page, enter:
Identity Provider: URL to the Solid OpenID Service (e.g.,
https://id.<DOMAIN>).LDP Storage Server: URL of the LDP Storage service (e.g.,
https://<DOMAIN>).
Click the Begin Tests button to run the first set of tests.
When these tests complete, you should see the results.
If all the initial tests pass, click on the Authenticate button. You should be redirected to a Provider selection page.
You may encounter an Authorization page. If so, click Authorize to continue withe the test.
Select a provider with whom you have an existing account and the specific account use for the login.
Once logged in, you are redirected to a standard OIDC Authorization screen.
Click the Authorize button. You should be redirected back to the ESS Server Verification webpage, and the second-phase set of tests should all run automatically.
If all of these checks are green, then the deployment was successful. If there are errors, contact Service Desk for support.
Access via Solid Application#
You can validate the installation process by accessing the deployed ESS from an application:
Open a web browser to https://podbrowser.inrupt.com.
In the login dialog that appears, enter
https://broker.<DOMAIN>.Click the
Log Inbutton.
Restart ESS#
Restart Running ESS Components#
To restart the ESS components running in the ess namespace:
Go to the
ess/deploymentdirectory.cd ~/ess/deployment
Run the
restart.shscript:./scripts/restart.sh
Restart an ESS Service#
To restart a specific ESS service if it is not running, run the following command, specifying the deployment to restart:
kubectl rollout restart <service app deployment>
To check the status of the rollout, run the following command, specifying the deployment:
kubectl rollout status <service app deployment>
Delete ESS#
This operation deletes the ESS components and namespace from the Kubernetes cluster.
Go to the
ess/deploymentdirectory:cd ~/ess/deployment
To delete ESS components and the
essnamespace from the Kubernetes cluster, run thedelete.shscript, passing in the environment value specified during the installation initialization (e.g.,dev,testing, etc.):./scripts/delete.sh <env>When prompted for confirmation, enter
yto continue.To verify that all ESS components and services are gone, run the following command:
kubectl get namespaces
The
essnamespace will not appear among the returned namespaces.
Stop/Start/Delete Minikube#
Stop Minikube#
To stop Minikube, run the following command:
minikube stop
This command shuts down the Kubernetes cluster and Minikube.
Start Minikube#
To restart Minikube, run the following commands:
minikube start

kubectl config set-context --current --namespace=ess
The operation returns a message stating Context "minikube" modified.
Minikube and all related services are booted back up as before.
Delete Minikube#
To fully delete the Kubernetes cluster and Minikube, run the following command:
minikube delete
This command removes everything, and it will require a full rebuild to spin the environment back up again.