Install on AWS#
Overview#
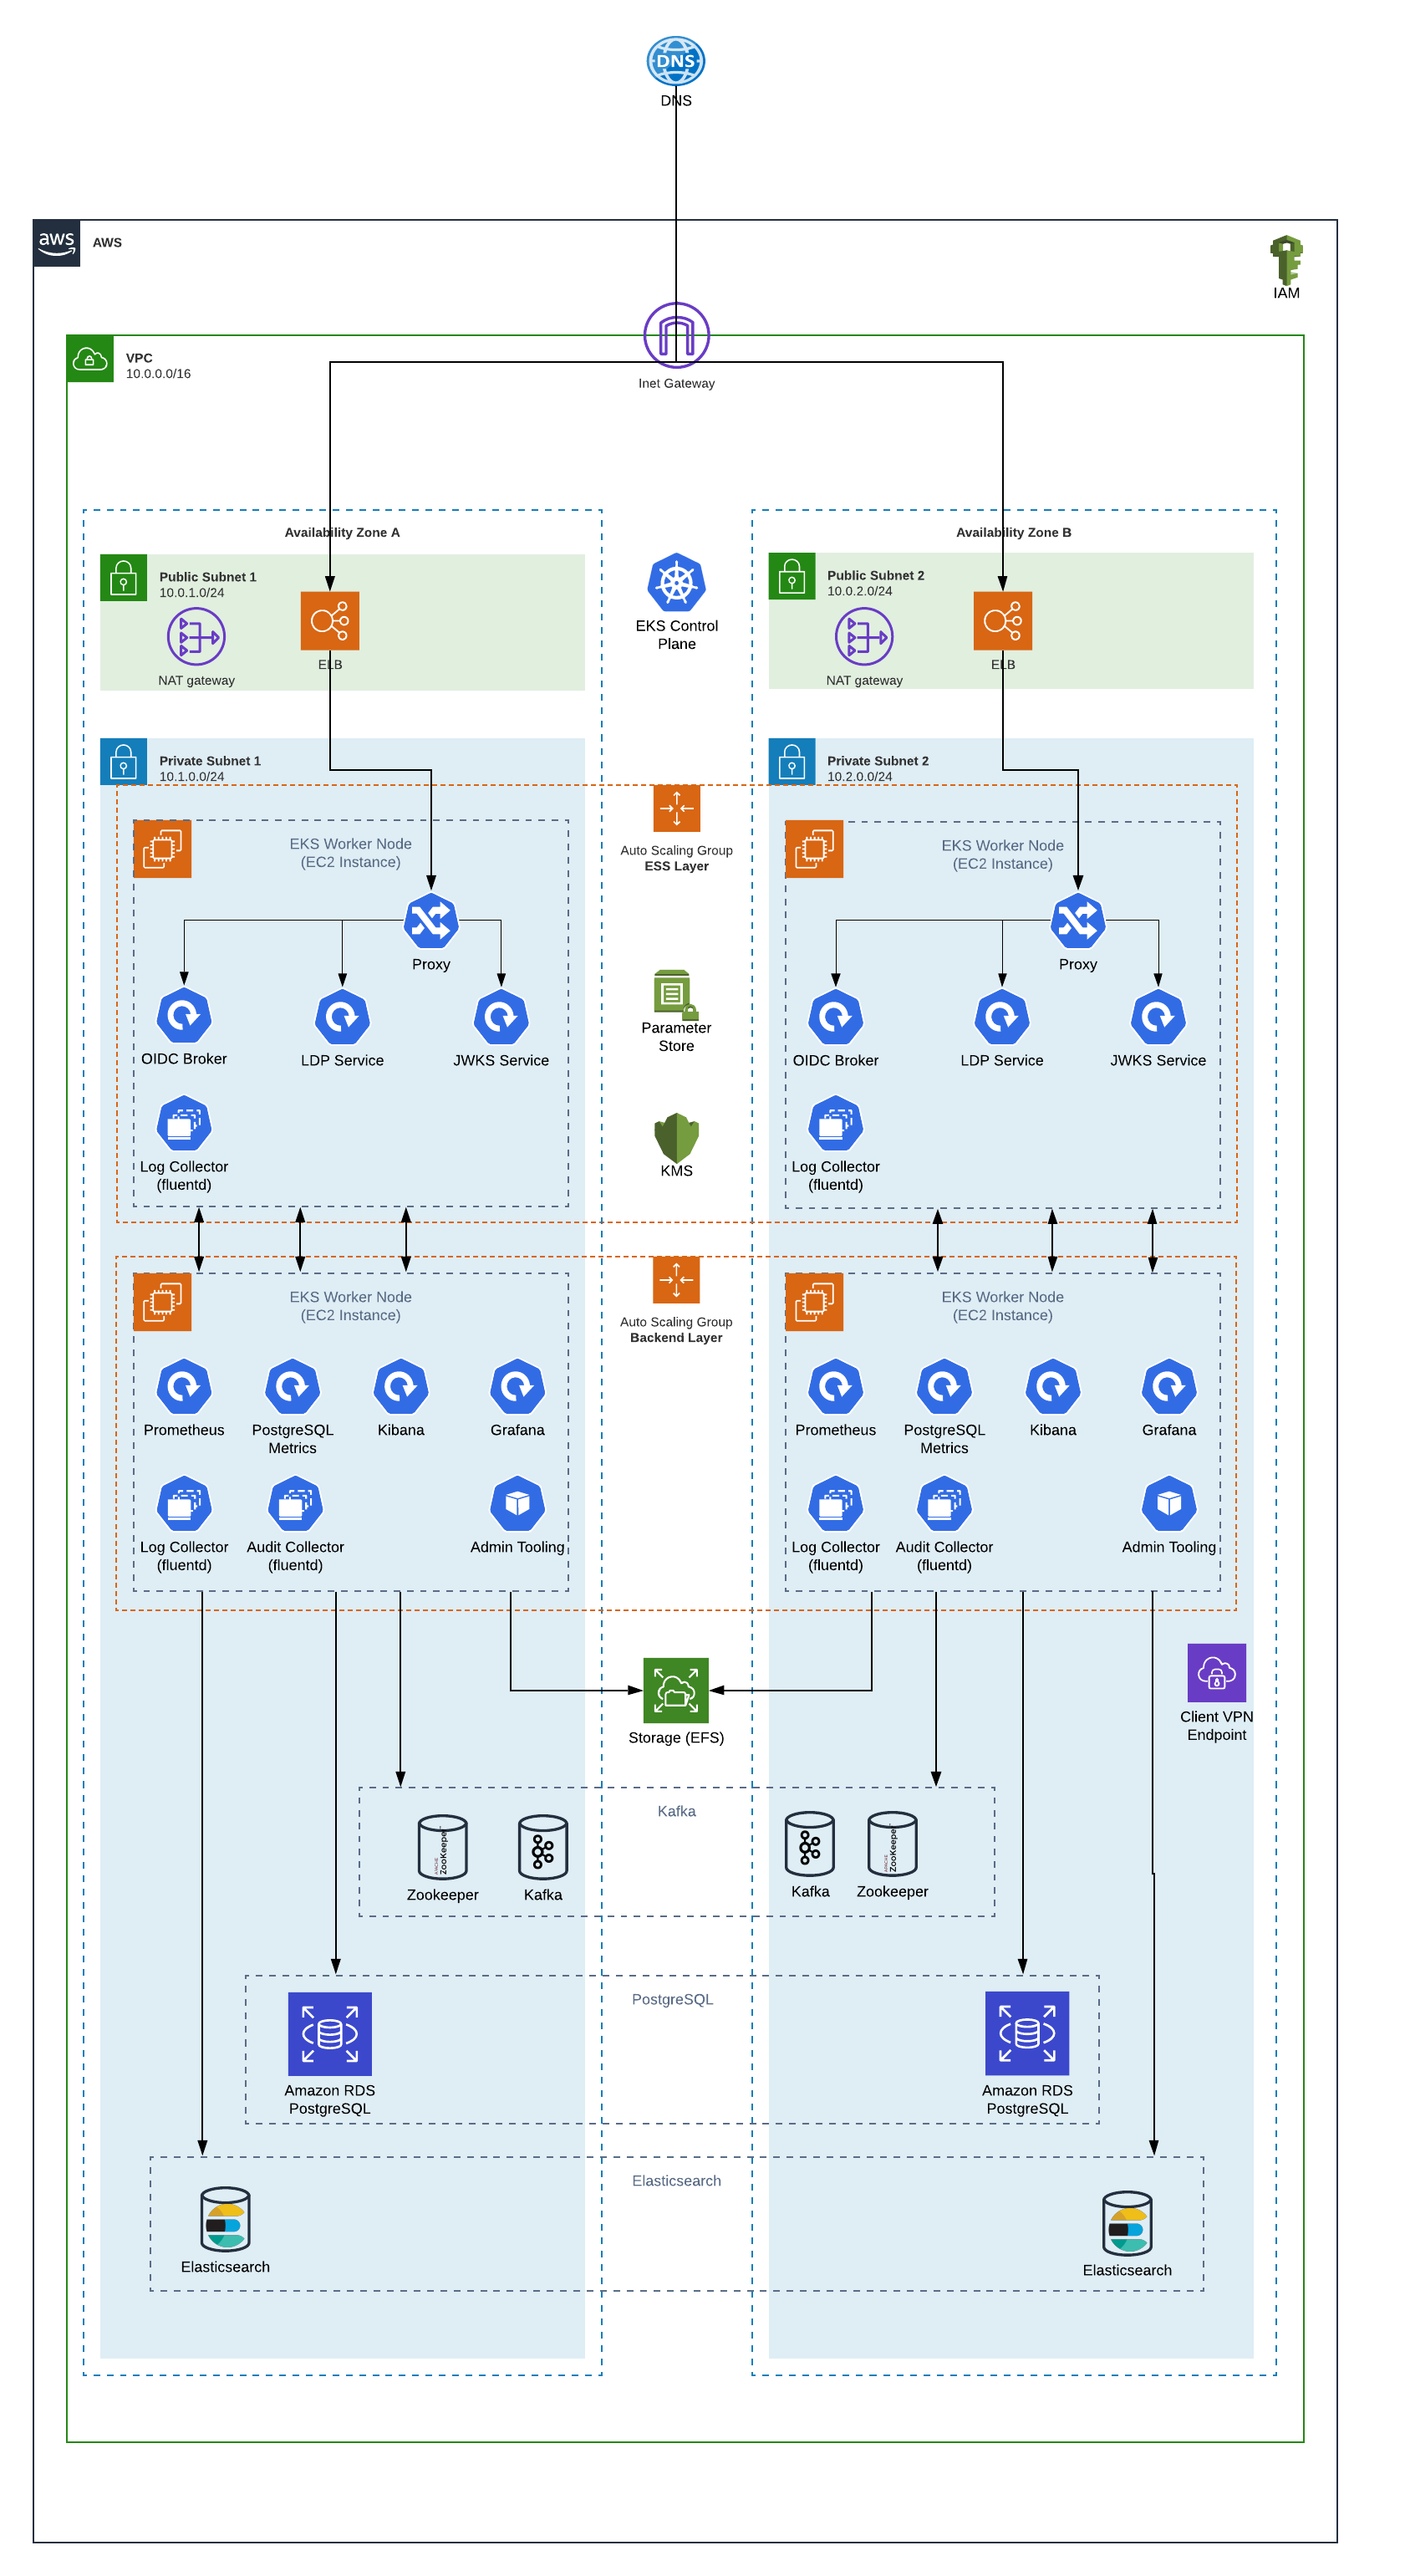
This document sets up a reference deployment of Inrupt Enterprise Solid Server (ESS) onto the Elastic Kubernetes Service (EKS) in Amazon Web Services (AWS).
Architecture#
Key Architectural Points#
All access to the Inrupt services passes through an Elastic Load Balancer (ELB). These are the only resources in the public subnets, and are created by EKS processes. They are configured to only allow traffic on ports 80 and 443 (HTTP and HTTPS), and only allow that traffic to pass through to the “proxy” containers in EKS.
The proxy containers are nginx containers that serve two purposes:
Route application traffic to one of the public-facing Inrupt service containers (identity and LDP). By using kube-dns, these containers can be scaled out without any changes to the client or proxy logic.
Serve a basic Resource Description Framework (RDF) document to internal HTTP requests. This is the “registrar agent” and will be covered later in this document.
EKS capacity is managed by different Auto Scaling Groups (ASGs). This allows the EKS capacity to scale up or down depending on needs:
“ess” services: The services providing the Inrupt public Application Programming Interfaces (APIs) (identity, LDP), as well as the proxy containers, are placed on EKS nodes marked for “ess” services.
“backend” services: Any remaining services are placed on EKS nodes marked for “backend” services. For this installation guide, the “backend” services include the monitoring and logging services, such as Prometheus, Grafana, Postgres Metrics and Kibana.
This separation allows the two sets of services to scale up/down independently of each other. They will not use the same underlying EC2 worker nodes.
The EKS worker nodes will be provisioned with an instance role. That role will allow the containers access to Key Management Store (KMS) keys and System Manager (SSM) parameter store secrets. This allows the containers to pull sensitive information into their processes without exposing the secrets via the Kubernetes API or storing them in code repositories or other insecure locations.
For simplicity, this installation guide will show Kubernetes pulling images directly from Inrupt’s software repositories. However, it is recommended customers set up their own Docker image repository such as Elastic Container Registry (ECR) to avoid having an explicit reliance on an outside resource. Depending on the license contract, customers may also be rate or bandwidth limited in their access to Inrupt’s repositories. Pulling images from an ECR repository in the same AWS region as the containers will speed up the time it takes for EKS to launch containers and contain risk to components the customer directly manages.
EKS nodes will also have access to an Elastic File Storage (EFS) volume for some local storage shared between service containers.
Several backend services are required outside of the Kubernetes cluster. This installation guide will walk through creating these using AWS managed services, but customers may choose to provide their own (either via a managed service or manually managed instances):
Kafka/Zookeeper - this will be provided via a Managed Streaming for Apache Kafka (MSK) cluster in this guide. This provides asynchronous event messaging between ESS components.
PostgreSQL relational database - this will be provided via a managed Relational Data Service (RDS) instance in this guide. This provides the RDF and binary data storage for the ESS system.
Customers will most likely wish to also install monitoring systems such as Grafana and Prometheus. This guide will not walk through the installation and configuration of these systems, but for additional information users can refer to the appropriate installation guide.
The ESS system consists of several microservices, each one available as a self-contained Docker image.
Docker aims to make containers entirely platform independent so that they run on any Docker or Kubernetes host system. However, differences in the virtualization stack (e.g., Hyper-V on Windows) can cause unexpected differences.
Note
Inrupt certifies that all of its containers have been tested on and will run on recent versions of Amazon Linux 2. There are no known issues running Kubernetes worker nodes with another RHEL based Linux distribution, but these have not yet been certified by Inrupt.
Prerequisites#
Site Planning#
ESS by design requires users to access the system via known domain
names. Obtain a domain (e.g., example.com) from a domain
registrar, and be familiar with adding CNAME and TXT based records to
your Domain Name System (DNS) provider. In addition to the root level
domain, you will need to reserve and secure subdomains for each
public facing API service.
Repository Account#
The ESS Docker images and install configuration files are hosted on Inrupt’s CloudSmith Repository. To download, you need to obtain the following details from Inrupt:
An entitlement token, and
The version number of the software that you can download with the token.
To obtain the token and associated version number, you can either:
Request them from your Inrupt representative, or
Send an email to distribution@inrupt.com.
Terraform 0.12 or greater#
Following the Infrastructure-As-Code process, this guide uses Terraform to manage your AWS inventory and promotion of changes between environments.
Inrupt recommends using the latest version of Terraform, or at minimum, versions 0.12 or greater.
If Terraform is not installed, refer to Terraform’s official site to install.
To check the Terraform installation and version, run:
terraform -version
The operation returns the version information, e.g.:
Terraform v0.14.2
Command Line Utilities#
unzip#
If unzip is not installed, install:
sudo apt install unzip
To check the unzip installation, run:
which unzip
curl#
curl is installed by default on recent
Ubuntu and macOS, and is available for almost all *nix package
managers, or can be compiled from source.
To check the curl installation and version, run:
which curl
For more information, see curl’s official download page.
jq#
jq is a command line application
for processing JSON strings. The install guide uses jq to parse
responses from calls to web based services like the AWS API.
If jq is not installed, refer to its official download page to install.
To check the jq installation, run:
which jq
kubectl#
kubectl is
a command line utility to interface with Kubernetes clusters. This
installation guide uses kubectl to launch and manage ESS containers
in an AWS EKS cluster.
If kubectl is not installed, refer to the kubectl installation
instructions.
To check the kubectl installation and version, run:
kubectl version --client
git#
git will be used to pull some third party utilities used to create TLS certificates.
If git is not installed, refer to https://git-scm.com/downloads.
To check the git installation, run:
which git
Amazon Web Services#
AWS Account#
This installation guide assumes a single AWS account and uses an IAM user with Programmatic access and AdministratorAccess policy in that account.
For the creation and organization of AWS accounts, refer to your organization’s policies.
To create the IAM user:
Log in to the AWS Console.
Navigate to the IAM service.
Create a new IAM user with Programmatic access.
Assign the new user the AdministratorAccess policy.
Important
Make note of the access key id and secret access key when
creating the IAM user. These are your credentials to access AWS
APIs, and should be secured as highly sensitive information as they
will have access to do almost anything to your AWS account.
Various points in this installation guide will refer to the “AWS
Profile”. Interaction with the AWS CLI can be done with profiles,
usually defined in ~/.aws/credentials. To create the
~/.aws/credentials file:
Create and edit the
~/.aws/credentialsfile:mkdir -p ~/.aws vi ~/.aws/credentials
Update the file with content similar to the following, substituting your AWS access key id and secret access key:
[default]
output=json
region=us-east-1

[dev]
aws_access_key_id = LZVCODJKQWS
aws_secret_access_key = SOMESECRETKEY
region = eu-west-2

[prod]
aws_access_key_id = XATLTWAUPZK
aws_secret_access_key = SOMEOTHERSECRETKEY
region = us-west-1
The above example defines a default profile. This profile will be
used if another profile is not explicitly specified, but as the
default profile has no keys, you will not be able to do anything
with it. It also defines profiles for the dev and prod
environment with a different sets of keys and different regions.
Additional details can be found at Configuring the AWS CLI.
AWS CLI version 2#
AWS Command Line Interface (CLI) is used to interact with AWS for operations that cannot be performed through Terraform. Additionally, Terraform uses the CLI configuration to obtain a profile and access/secret keys.
Install AWS Command Line Interface (CLI) version 2. Refer to the AWS CLI installation instructions.
To check the CLI installation and version, run:
aws --version
Installation#
The steps for deploying a full installation of ESS to AWS are described below.
Step 1: Download the Installer Scripts#
Create the directory for your installation and change to the directory:
mkdir /tmp/installation-guide
cd /tmp/installation-guide
Download the
.zipfile containing the ESS installation scripts. Replace<TOKEN>and<VERSION>with the values provided to you by Inrupt:curl -O https://download.software.inrupt.com/<TOKEN>/release/raw/names/ESS-Scripts/versions/<VERSION>/ess-reference-scripts.zip
Unzip the file:
unzip ess-reference-scripts.zip
Step 2: Environment Variables#
Go to the
deploymentdirectory:cd deployment
Initialize your AWS environment variables:
./scripts/installer.sh -p aws -c init
The script prompts for various values needed to build your deployment configuration files and stores these values in an ESS config file
<environment>.config, where<environment>is one of the prompted values.When prompted, enter the appropriate values needed to build your deployment configuration files.
Tip
When prompted for the OIDC Broker (
Do you want to install the
OIDC Broker
), enteryorYto enter the OIDC Broker values at this time.Otherwise, you must rerun the whole init script later to initialize for the OIDC Broker installation. That is, for the OIDC Broker installation, you must reenter the ESS values before you can enter the OIDC Broker values.
When configuring the backend identity provider for the OIDC Broker, remove all spaces and new lines when entering the
application name.
Step 3: Build the Infrastructure#
Note
Changed in version 1.0.7: Starting in version 1.0.7, the tutorial no longer uses Secure Shell (SSH) keys to provision EC2 instances. The use of SSH keys in the earlier versions of the tutorial was a nontypical use, and SSH keys are generally not needed in the ESS setup.
3A: Download the Terraform Configuration Files#
Run the 02_download-configurations.sh script, replacing
<environment> with the value entered in
Step 2: Environment Variables (e.g., dev, prod).
./scripts/aws/infrastructure/02_download-configurations.sh <environment>
3B: Create the Infrastructure#
Run the 03_install-infrastructure.sh script, replacing
<environment> with the value entered in
Step 2: Environment Variables (e.g., dev, prod).
scripts/aws/infrastructure/03_install-infrastructure.sh <environment>
The script prints the plan and waits for user input to continue. Review
the plan. When ready to continue, enter y or Y to apply the
plan.
See also: Infrastructure Configuration.
Step 4: Manage Secrets#
The ESS services use a number of environment variables to configure functionality; e.g., database passwords, service API tokens, TLS certificates/keys, etc. See Appendix A: Kubernetes Secrets.
The reference deployment uses AWS SSM Parameter Store to store the variables.
Warning
Fully compromising a node or container in the Kubernetes cluster still allows access via the AWS APIs to SSM and KMS, so it is not stripped of all attack vectors on these secrets. However, this approach is significantly better than having secrets available in plain text. Further securing of these containers is up to the enterprise IT teams installing the system.
4A: Store Proxy Certificates as ESS Environment Parameters#
All external access to the ESS services passes through the proxy containers in EKS. These are exposed to the internet via Elastic Load Balancers in the public subnets. These proxy services need to be secured with signed TLS certificates.
For the purposes of this reference deployment, Inrupt uses Let’s Encrypt. In a production environment, it is up to the customer to determine a suitable TLS certificate provider.
Create the proxy certificates and store the Base64 encoded
representation of the signed certificate and key. Replace
<environment> with the value entered in
Step 2: Environment Variables (e.g., dev, prod).
./scripts/aws/infrastructure/04_setup-letsencrypt.sh <environment>
4B: Store ESS Environment Parameters#
Run 05_aws-parameters.sh. Replace <environment> with the
value entered in Step 2: Environment Variables (e.g.,
dev, prod).
./scripts/aws/infrastructure/05_aws-parameters.sh <environment>
Step 5: Set up EKS infrastructure#
For this installation guide, the ESS services will be launched into a Kubernetes environment provided by AWS EKS.
Setup the Kubernetes environment via EKS. Replace <environment>
with the value entered in Step 2: Environment Variables
(e.g., dev, prod).
./scripts/aws/infrastructure/06_k8-provision-access.sh <environment>
Step 6: Obtain Docker Images#
Users in pre-production environments may skip this step and continue with the installation guide.
The Inrupt ESS services are provided to customers as Docker images. Although this installation guide pulls the Docker images directly from the Inrupt repositories into the EKS cluster, this is not recommended for production usage.
Customers should instead obtain their own image repository hosting and transfer images there, and update the deployment files later in this installation guide to point to the new URLs. Additional details are available in Appendix B: Docker Image Repositories.
Access to these repository URLs will be provided by Inrupt outside of this installation guide. You will need to contact Inrupt in order to obtain the information required to download the Inrupt ESS from the Inrupt repositories. Please send an email to requests@inrupt.com and attach your public key (either RSA or PGP). You will be contacted to verify the fingerprint for your public key and then you will receive an email with an encrypted and signed entitlement grant and instructions on how to download the product.
Step 7: Install and Launch ESS Services#
Run the
installer.shfile to download and build your ESS AWS configuration files../scripts/installer.sh -e <environment> -p aws -s ess -c build
Run the
installer.shfile to deploy ESS in to EKS../scripts/installer.sh -e <environment> -p aws -s ess -c install
The
installer.shprints the following line upon success:ESS deployment installed successfully!
Tip
If the deploy operation does not complete successfully, you can safely retry the operation as it is idempotent.
If the retry also does not succeed, see also Troubleshoot Installation.
Step 8: DNS Records#
Add DNS CNAME entries that point to the ELB proxy service.
For example, assuming that your DNS controls the domain
example.com:
Add a CNAME record for
solidserver.example.comto point to the the proxy service (e.g.,abcdef12321321-12345677.us-east-2.elb.amazonaws.com).Add a CNAME entry for
*.solidserver.example.comto point tosolidserver.example.com.
The exact mechanism of adding DNS records is highly dependent on your domain/DNS supplier. Refer to your domain/DNS supplier on instructions on how to add the CNAME entries.
Verification#
ESS#
Note
Replace <DOMAIN> with the domain name for your deployment.
Access via Application#
You can validate the installation process by accessing the deployed ESS from an application:
Open a web browser to https://podbrowser.inrupt.com.
In the login dialog that appears, enter
https://broker.<DOMAIN>.Click the
Log Inbutton.
Autoscaler#
Optionally, ESS can scale to handle large amounts of traffic throughout the day. When it detects high volumes of traffic, it will scale up and when traffic volumes are low it will scale back down. It does this by increasing the number of deployment replicas and distributing the load among them. It will also increase the number of underlying EC2 nodes running the cluster and distribute the containers among them. This will keep infrastructure costs to a minimum but also allow it to handle large amount of network traffic.
Note
The autoscaler feature is optional and does not have to be deployed for ESS to work. However, it is recommend in a Performance or Production environment to handle high load.
The reference deployment includes the Autoscaler component. To check the status of the Autoscaler:
kubectl get horizontalpodautoscalers.autoscaling
You can also run kubectl get hpa for short.
The operation should return information that resembles the following:
NAME      REFERENCE            TARGETS         MINPODS   MAXPODS   REPLICAS   AGE
ess-ldp   Deployment/ess-ldp   0%/40%   2         30        2          57s
Tip
To get more information about how the Autoscaler is running execute:
kubectl describe hpa.
See also Scaling.
Monitoring Service#
To monitor the health and performance characteristics, ESS comes with a reference monitoring module. This reference module consists mainly of Grafana and Prometheus deployments that pull metrics from the internal ESS services and display them in a UI consisting of graphs and tables showing how ESS is performing.
Note
This is just a reference monitoring set up. ESS can integrate with other modern monitoring tools.
The monitoring feature is optional and does not have to be deployed for ESS to work.
To verify that the monitoring components are working, use port forwarding to connect to Grafana in the Kubernetes cluster:
kubectl -n ess port-forward service/grafana 3000:3000
The operation returns the following information:
Forwarding from 127.0.0.1:3000 -> 3000
Forwarding from [::1]:3000 -> 3000
Open https://localhost:3000/ in a web browser.
On the Home page, click Dashboards -> Manage -> 1. ESS LDP Deployment Metrics.
This opens the main LDP Deployment dashboard.
Note
The first time you connect to the Grafana dashboard, you will have to accept the self-signed certs.
Logging Module#
ESS includes an optional reference logging module that centralizes the logs of all the components that run inside the K8 cluster. The feature is optional and does not have to be deployed for ESS to work.
For the reference deployment, the deployed logging module consists of Fluentd and Kibana (EFK) Logging Stack and uses the Elasticsearch managed cluster created from the Terraform scripts. However, ESS can integrate with other modern centralized logging tools. For more information, see Centralized Logging to a Backend Logging System.
To verify that the logging components are working, use port forwarding to connect to Grafana in the Kubernetes cluster:
kubectl -n kube-logging port-forward service/kibana 5601:5601
The operation returns the following information:
Forwarding from 127.0.0.1:5601 -> 5601
Forwarding from [::1]:5601 -> 5601
Open https://localhost:5601/ in a web browser.
Kibana can take some time to start up and will display
Kibana
server is not ready yet
until it finishes loading.
Auditing#
ESS service will output auditing information of changes that have occurred to the server or the Pods it manages.
Note
Auditing feature is optional and does not have to be deployed for ESS to work.
The auditing deployment used as part of this tutorial is just a reference auditing implementation (i.e., for example purposes only).
Do not use the reference auditing configuration in production. The reference audit messages are not encrypted and are accessible in Elasticsearch.
To access audit logs for the reference deployment, you can use the same
Kibana instance used for system logging. The audit logs are persisted
to the same Elasticsearch instance under the ess-audit-* index.
For more information on auditing, see:
Shut Down ESS#
Go to the
deploymentdirectory under your installation directory.cd /tmp/installation-guide/deployment/kubernetes/aws
Run the
ess-shutdown.shscript, replacing<environment>with the value entered in Step 2: Environment Variables (e.g.,dev,prod)../scripts/aws/ess-shutdown.sh <environment>
Tear Down ESS#
In order to tear down the ESS deployment environment built above, the following steps must be followed:
Step 1: Shut down ESS#
Go to the
deploymentdirectory under your installation directory.cd /tmp/installation-guide/deployment
Run the
ess-shutdown.shscript, replacing<environment>with the value entered in Step 2: Environment Variables (e.g.,dev,prod)../scripts/aws/ess-shutdown.sh <environment>
If this step isn’t done first, it is likely that later steps will fail. Terraform does not know about, nor have permissions to delete, resources created by EKS (e.g., ELBs).
Step 2: Delete Terraform Infrastructure#
Go to directory for your AWS infrastructure:
cd /tmp/installation-guide/deployment/infrastructure/deployment/infrastructure/aws
terraform destroy
You will be shown a plan of what is to be deleted, and you will be asked to confirm.
After successful tear-down completion (which can take about 10 minutes), you should see a message like this:
Destroy complete! Resources: XXX destroyed.
If the terraform destroy command fails for any reason (e.g., it is possible for some operations to timeout), you may see an error similar to the following:
:
aws_subnet.public_2: Destruction complete after 0s
aws_security_group.eks-cluster: Destruction complete after 0s
aws_iam_role.eks-worker-nodes: Destruction complete after 1s
aws_iam_role.eks-cluster: Destruction complete after 1s

Error: Error waiting for Client VPN endpoint to disassociate with target network:
Unexpected state 'associated', wanted target 'disassociated'. last error: %!s(<nil>)
It is safe to re-run the terraform destroy command; the state file
will still have the existing resources and it will re-try the delete
operations.
Step 3: Manually Delete Prerequisites#
After confirming that terraform destroy completed successfully, you can manually delete the prerequisites that were created at the beginning of this installation guide.
Note
You will not actually be able to hard delete the certificate authority. Amazon requires that you soft delete the authority, and that it continues to live in a disabled state for at least 7 days.
Log into the AWS web console and delete:
SSH Key pair:
For pre-1.0.7 Versions Only.
Delete SSH Key pair step is needed for pre-1.0.7 versions.
Starting in Versions 1.0.7, this tutorial no longer uses SSH keys. The use of SSH keys in the earlier versions of the tutorial was a nontypical use, and SSH keys are generally not needed in the ESS setup.
Display the AWS EC2 console.
Select ‘Key Pairs’ from the main Resources section of the EC2 console.
Select the
ess-*key pair created as part of the install.Select the Delete option from the Actions drop-down menu.
Certificates:
Display the AWS Certificate Manager.
From the Services drop-down menu, select the
ess-vpn-*certificates created as part of the install.Select the Delete option from the Actions dropdown list.
Private root certificate authority:
Display the AWS Certificate Manager.
Select Private CAs from the left hand navigation.
Select the CA you wish to delete.
Click the Actions drop down and disable the CA.
Click the Actions drop down and delete the CA.
Tip
If you encounter errors saying that certificates are still in use,
then it could be because the VPN is still using them, in which case
the terraform destroy operation most likely did not complete
correctly.
Step 4: Delete the DNS CNAME Records Manually#
The final tear-down step is to manually remove the DNS CNAME records that you set up above.
Appendix A: Kubernetes Secrets#
Environment variables control much of the configuration and operation of containers in a Kubernetes deployment. They allow the same underlying Docker image to provide a range of services depending on how they are configured.
Sensitive data such as database passwords, service API tokens, TLS certificates/keys, etc. also need to make their way onto a container for secure operation.
In a development environment, these variables can simply be set as environment variables on the containers where they are stored and passed in plain text; i.e., they are available to anyone with access to the Kubernetes API, the underlying worker nodes, or the Kubernetes configuration YAML files.
In production environments, or any environment with sensitive data, however, you should not store or pass these variables in plain text. Inrupt strongly recommends that these secrets be secured by integration with utilities such as Hashicorp Vault, or AWS Key Management Service (KMS) and Systems Manager (SSM) Parameter Store.
The Docker images provided by Inrupt include an integration with the AWS KMS key (created via Terraform above) and with AWS SSM Parameter Store values. This keeps the secret values encrypted everywhere (except in-memory for the running microservice processes).
These secrets can be set using several environment variables on the Kubernetes containers. For example:
containers:
  - name: ldp
    env:
      - name: AWS_REGION
        value: "eu-west-2"
      - name: AWS_SSM_KEYS
        value: "/ess-dev/postgres-password,QUARKUS_DATASOURCE_PASSWORD:/ess-dev/postgres-username,QUARKUS_DATASOURCE_USERNAME"
      - name: AWS_SSM_FILES
        value: "/ess-dev/ldp-ssl-crt,/opt/inrupt/server.crt:/ess-dev/ldp-ssl-key,/opt/inrupt/server.key"
AWS_REGIONtells Kubernetes which region the secrets are stored in. This also triggers the integration with KMS/SSM.AWS_SSM_KEYtells Kubernetes to pull the key/ess-prod/postgres-password, and inject it into the microservice process environment asPOSTGRES_PASSWORD.AWS_SSM_FILEStells Kubernetes to pull the key/ess-prod/proxy-ssl-crt, Base64 decode the value, and save that as/opt/inrupt/server.crton the container file system. This allows even binary files to be stored in and retrieved from the Parameter Store if needed.
With the example infrastructure created above, you have an instance of an IAM profile that provides the following role policy:
policy = <<EOF
{
    "Version": "2012-10-17",
    "Statement": [
        {
            "Sid": "AllowAccessToESSParameterValues",
            "Action": [
                "ssm:GetParameters"
            ],
            "Effect": "Allow",
            "Resource": "arn:aws:ssm:${local.aws_region}:${data.aws_caller_identity.current.account_id}:parameter/${local.resource_prefix}/*"
        },
        {
            "Sid": "AllowDecryptionOfParameterValues",
            "Action": [
                "kms:Decrypt",
                "kms:DescribeKey"
            ],
            "Effect": "Allow",
            "Resource": "${aws_kms_key.eks_container_key.arn}"
        }
    ]
}
EOF
This means that the processes running on the EKS worker nodes will be
able to access and decrypt stored secrets that start with the path
${local.resource_prefix}/. This keeps secrets out of the Kubernetes
configuration files and out of the container configuration output from
the Kubernetes API.
Warning
Fully compromising a node or container in the Kubernetes cluster still allows access via the AWS APIs to SSM and KMS, so it is not stripped of all attack vectors on these secrets. However, this approach is significantly better than having secrets available in plain text. Further securing of these containers is up to the enterprise IT teams installing the system.
Appendix B: Docker Image Repositories#
This installation guide pulls docker images directly from Inrupt hosted repositories. However, this is not recommended for production usage. Because of the size of docker images, Inrupt may choose to rate or bandwidth limit access to these images in the future. Additionally, in a production environment, it is generally not a good idea to rely on an external repository being available 24x7.
Thus, while the Inrupt release repositories work well for demonstration purposes in this installation guide, it is recommended that clients create their own container repository, and transfer images there before using those URLs in Kubernetes configuration files.
There are many container repository offerings including:
Whatever platform/provider is chosen, it is incumbent on the client to properly secure images that have been licensed to the client. These should only be available to Kubernetes clusters specifically licensed to use them.
Image Transfer - AWS Example#
Images can normally be transferred to another docker repository using simple docker command line calls. For example, transferring from Inrupt’s repository to your own ECR repository would look similar to the code below:
Login to Inrupt release repository. - Username: inrupt/release - Password: (Provided by Inrupt)
docker login docker.software.inrupt.com
Pull image from Inrupt to the local workstation.
docker pull docker.software.inrupt.com/inrupt-identity-service:x.x.x
Tag the local image with URL for your ECR repository. This example uses a single ECR repository for all images with different tag names for each image.Replace
_YOUR_ECR_URL_with your ECR URL in the command.docker tag docker.software.inrupt.com/inrupt-identity-service:x.x.x _YOUR_ECR_URL_:inrupt-identity-service-0.2.1
Log in to your ECR repository. Replace
_YOUR_ECR_REGION_with your ECR region in the command.eval $(aws --profile ${ENVIRONMENT} --region _YOUR_ECR_REGION_ ecr get-login --no-include-email | sed 's/ -e none//')
Push image to your ECR repository. Replace
_YOUR_ECR_URL_with your ECR URL in the command.docker push _YOUR_ECR_URL_:inrupt-identity-service-0.2.1